Demystifying Dressmaking Patterns
One of the greatest inventions in the world of home dressmaking is the paper pattern. It is also one of the most confusing. Dressmaking is a wonderful craft that allows us to create our own perfectly styled, perfectly fitting garments, especially when we are looking for a specific type of outfit and can’t find it anywhere in the shops, or we want to avoid turning up in the same outfit as someone else. Dressmaking patterns, however, can be very confusing and leave us feeling like we don’t know where to start and, I believe, this stops many of us from jumping in to a craft we know we’d love. This post is all about taking the guess work out of it and explaining exactly what all those numbers and symbols mean so that you can start your first ever dressmaking project with confidence.
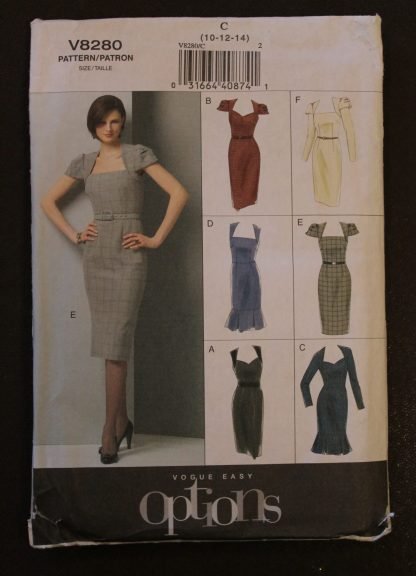
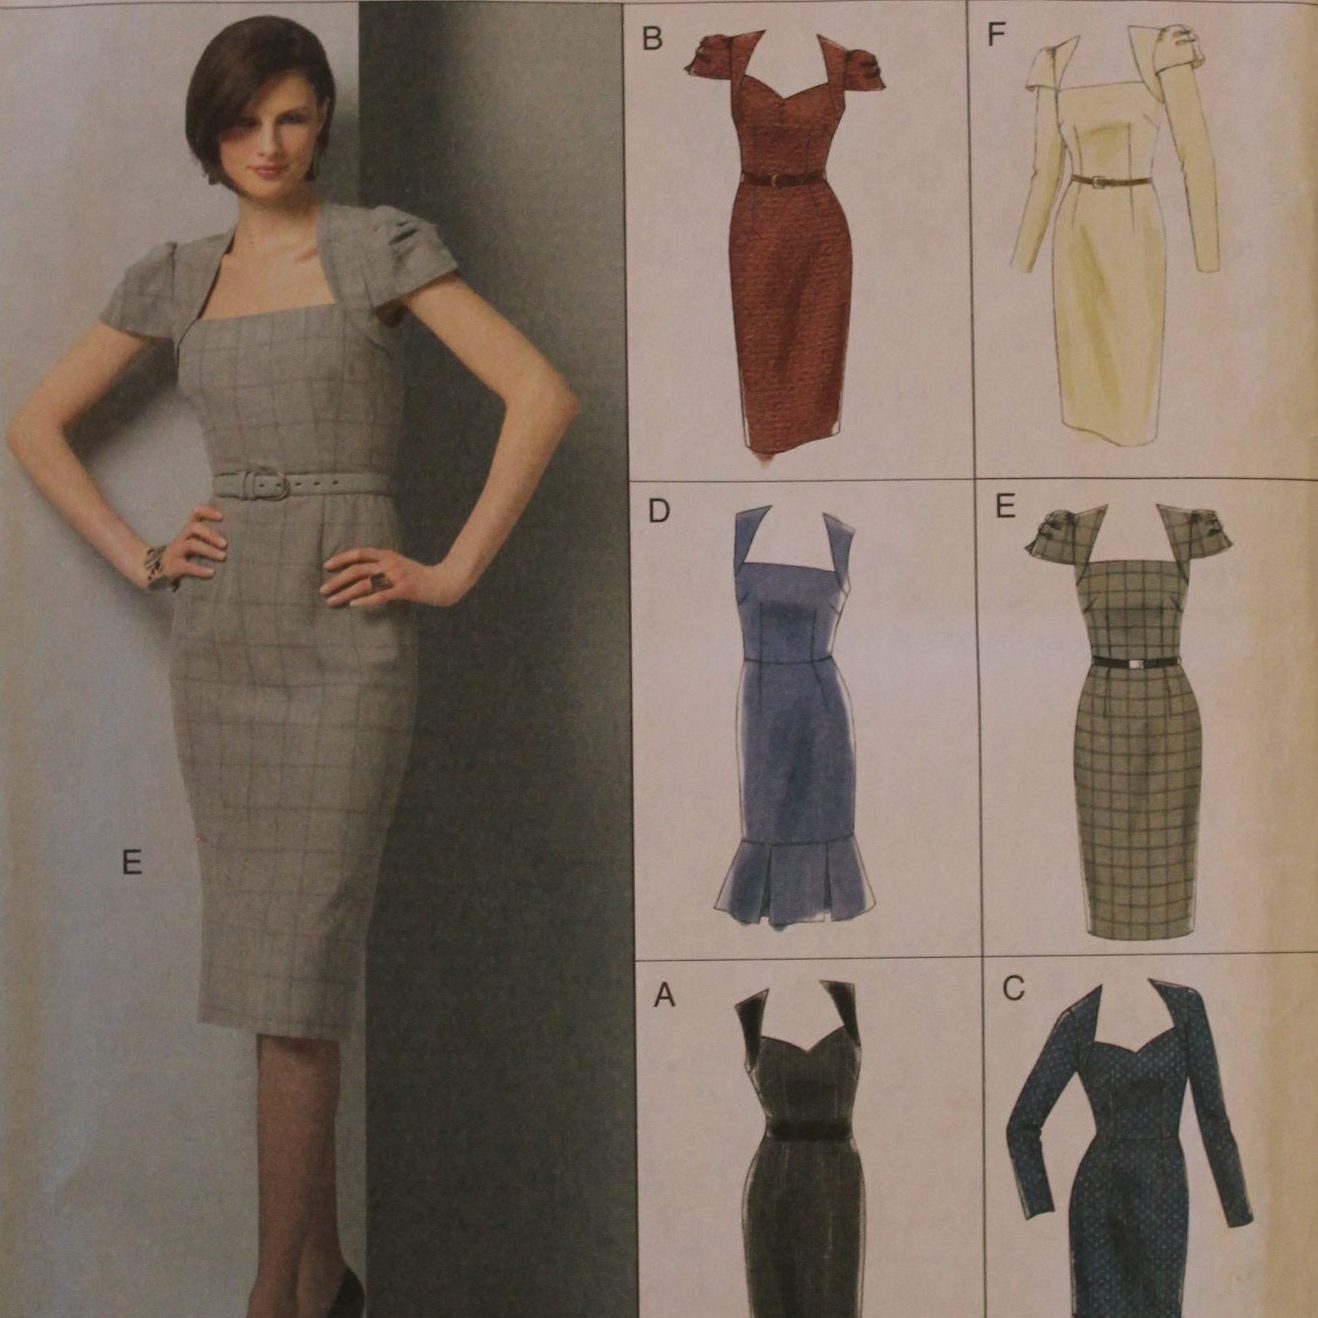
1. The first step is to understand what everything means on the envelope. Patterns will often come in multiple sizes, or a range of sizes, and will contain variations on a similar style garment. The pattern we are using in this tutorial is for a dress. It is important that you pick a pattern that suits your skill level and will create a garment that you will wear with pride. This pattern is a ‘Vogue Easy’ pattern and so will be suitable for all abilities. We can also see that the sizes this pattern comes in, this particular envelope contains sizes 10, 12, and 14. It is important to check this. If a pattern doesn’t have your size on it, enquire for a different size of the same pattern. I know that the other size options for this pattern are ‘sizes 4, 6, and 8’ and ‘sizes 16, 18, and 20’. Choose which style of garment option you are going to make and make a note of the number. For this example we are going to make garment E as shown in the main picture.
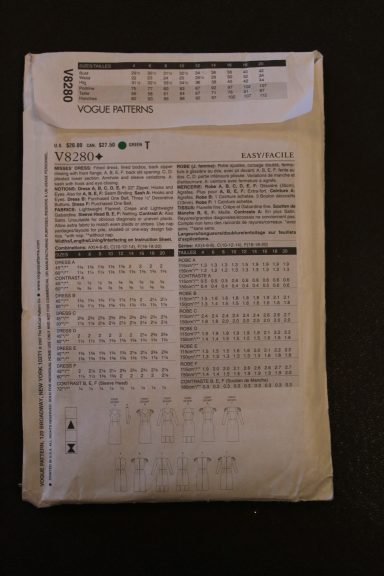
2. The back of the envelope can seem like a sea of numbers when you first look at it. However, once you understand what it all means, you realise that all the information is important and there to help you get the best results. It’s important to mention that not all pattern envelopes will be identical to this one. They will, however, all contain the same information somewhere on the envelope so be rest assured once you know what you are looking for you will be able to read any pattern envelope.
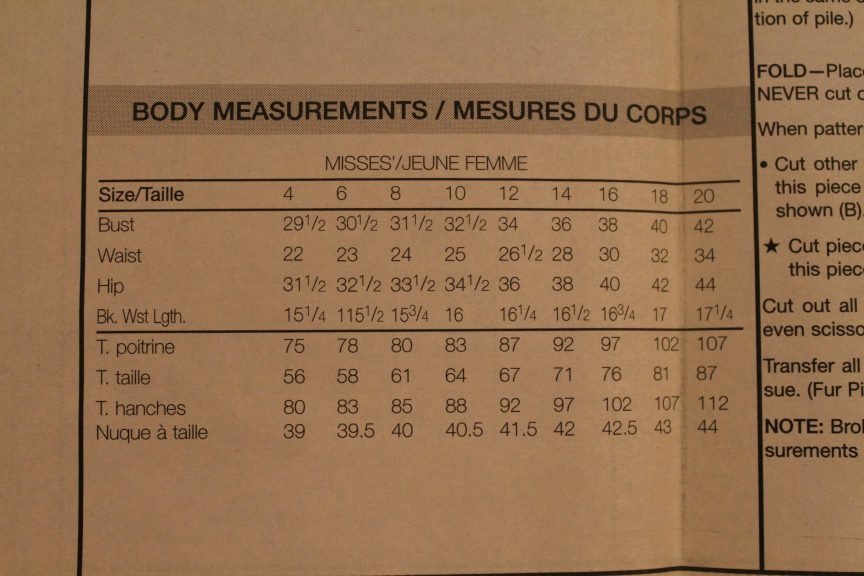
3. The first numbers we see are the dress sizes broken down into three measurements: bust, waist, and hip. When measuring these parts of your body make sure you are relaxed, standing normally (no breathing in!), and can fit two fingers under the tape measure. Mark the pattern at the measurements you are. Don’t worry if you find you are different sizes in different places, or you seem to measure a dress size much bigger or smaller than you are in the shops. Standard dress sizes differ from pattern to pattern, as they do shop to shop, so just class it as a guide number rather than a dress size. If you find you seem to measure on different sizes I would recommend going for the biggest size as we can always make the pattern smaller. In this example I would cut the pattern to a size 14 and adjust at the bust and hips as necessary.
(See step 15)
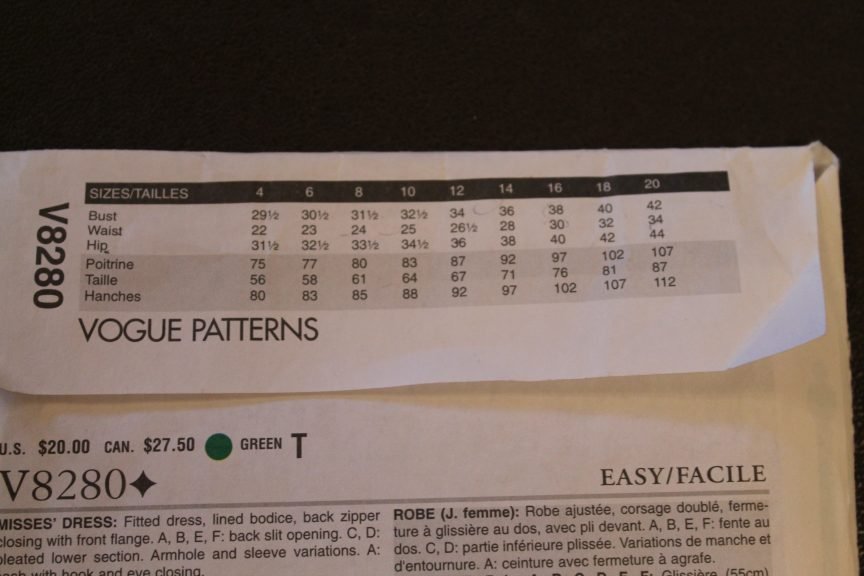
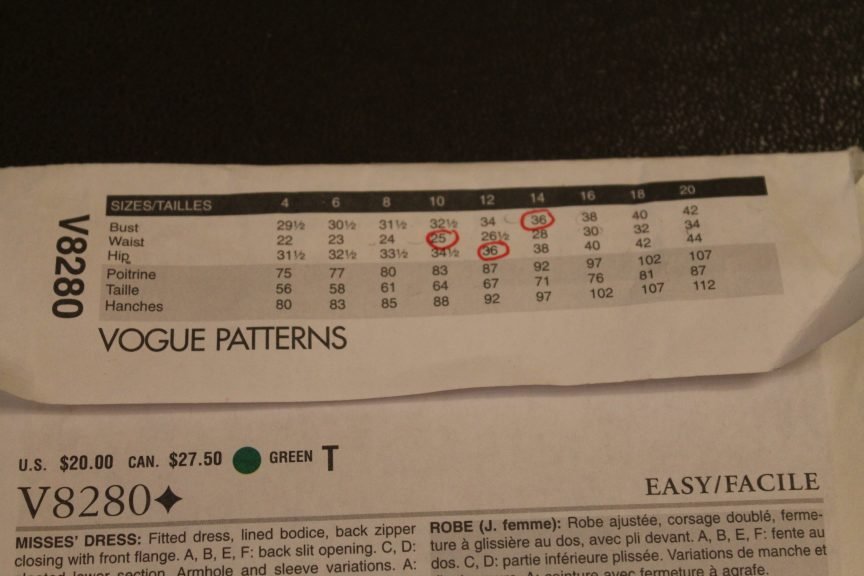
4. The next section tells us some information about the garment and what we will need to make it. As you can see here again it states the difficult level as ‘easy’. You will also notice that the information is given to us in English and in French. This is fairly standard across dressmaking patterns. Here we can also see a written description of the garment.
5. The next lot of information is regarding the NOTIONS we will need. Notions are haberdashery items such as buttons, zips, and bias binding for example. To make dress E we only need to pay attention to the items listed that relate to that number, so for example we will require a 22” zip, hooks and eyes, and some seam binding. The rest of the listed items relate to styles of dress that we aren’t making. So already we are able to discount some of the sea of information.
6. Finally, in this section we can see what FABRIC we will need. Here we can see that the garment is designed to be made from either lightweight flannel, crepe, or lightweight gabardine. For dress E we also need some netting for the sleeve heads.
To decipher some of the jargon present here: ‘nap’ means a fabric with a pile such as velvet or fur. More fabric is allowed for fabrics that have this sort of finish as all of the pattern pieces can only be laid in one direction, thus using more fabric than one without a ‘nap’. If your fabric contains a one way pattern or is shaded then the same fabric allowance rules apply.
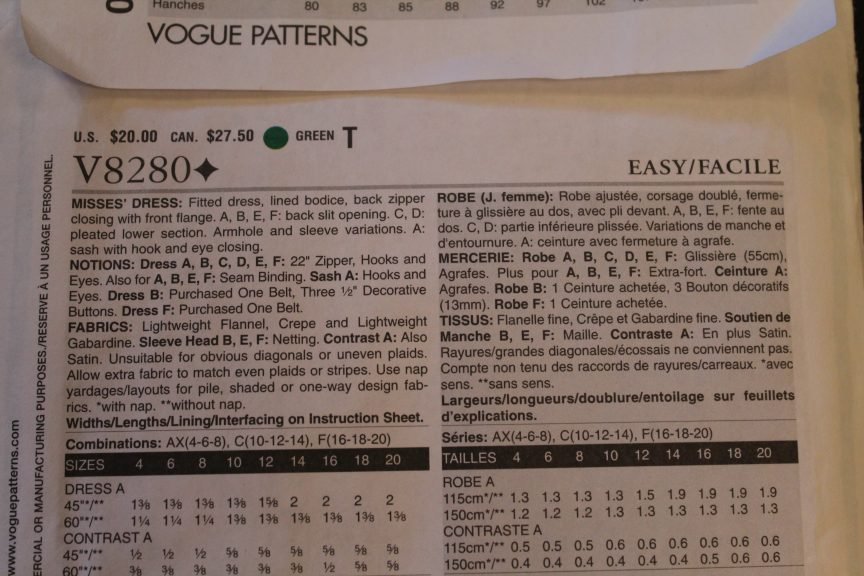
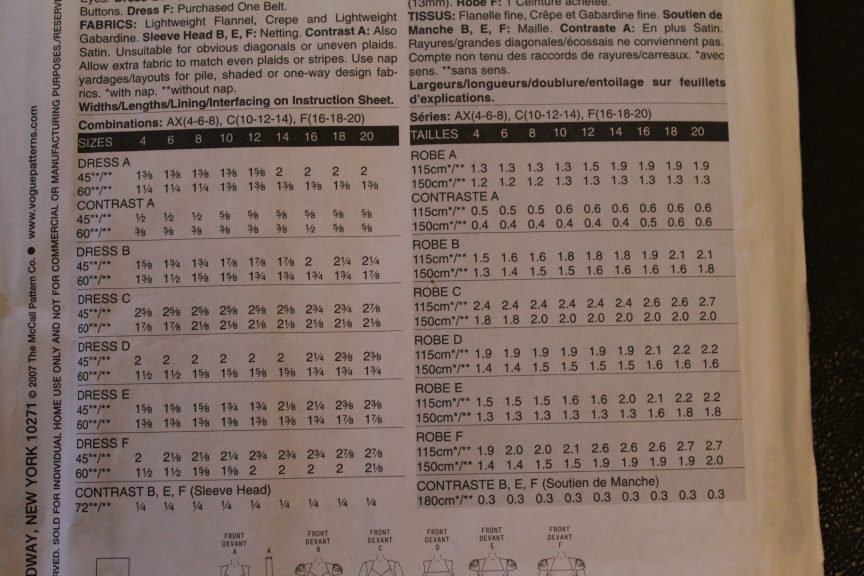
7. The next section contains the amounts of fabric we will require. This is where the French side of the information box can come in handy for purposes other than convenience for those who read French. As you can see the English side shows the measurements required in imperial (inches and yards) while the French side shows the same information in metric (centimetres and metres). So if you prefer to use metric values then just refer to the French side. We can refer to dress E and clearly see the amount of fabric required for both standard fabric widths (size 14, dress E, for a 45” wide fabric we need 2 1/8’ or for a 60” wide fabric we need 1 3/8’).
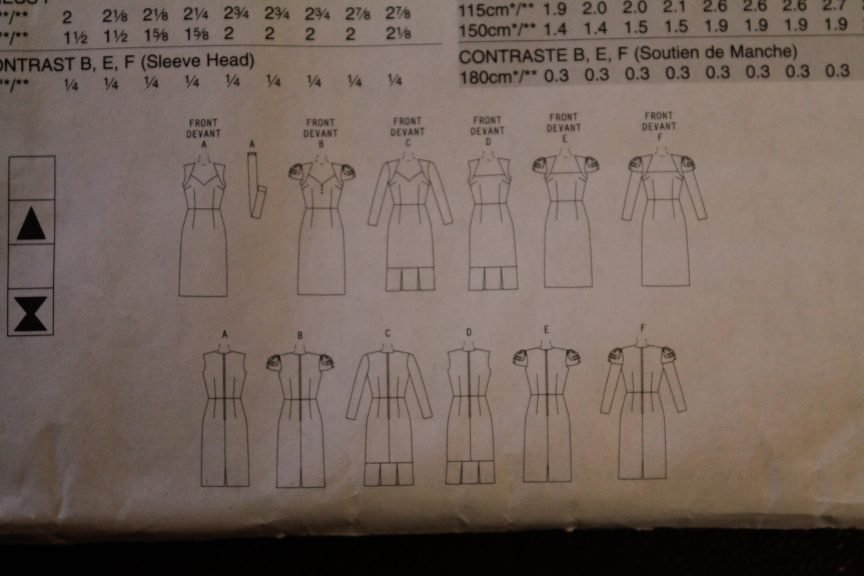
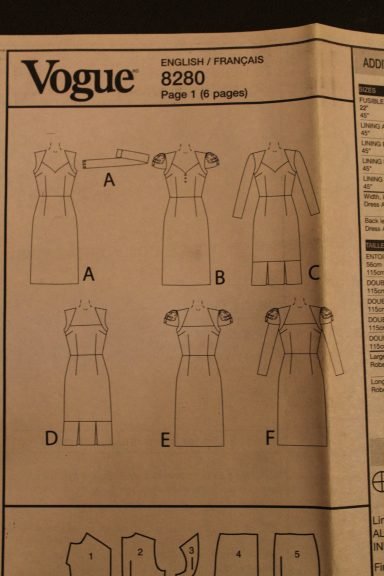
8. The final element of information on the envelope are the line drawings of the front and back of each style of dress. This is useful as it demonstrates where the sewing lines, darts, pleats, and fastenings are going to be. This can help you decide whether you feel this pattern is suitable for your own skill level.
9. So now we know what size we are making, what types of fabric we can use and how much we need, and all of the notions that are required. The next thing to do is to open the envelope and find the instruction sheet.
10. When we open up the instruction sheets the first thing we can note is that we have 3 double sided sheets and in the top left hand corner we can see exactly what order they go in. The number of sheets will vary from pattern to pattern but with our dress pattern we can see that the first page say 1 of 6. I recommend reading through all of the instructions before starting so that you are clear on what you need to do. Again we have larger outline drawings of the different style options available for reference.

11. The next piece of information we are given is outline drawings of the pattern piece shapes and their relevant numbers. I like to mark the pattern piece numbers that I require for my garment, although these are listed later in the instructions. Beneath the list of pattern pieces the body measurements are repeated with the addition of the ‘back waist length’ or ‘nape to waist’ as it’s sometimes called. This is the distance between the prominent bone at the base of your neck down to your waist line.
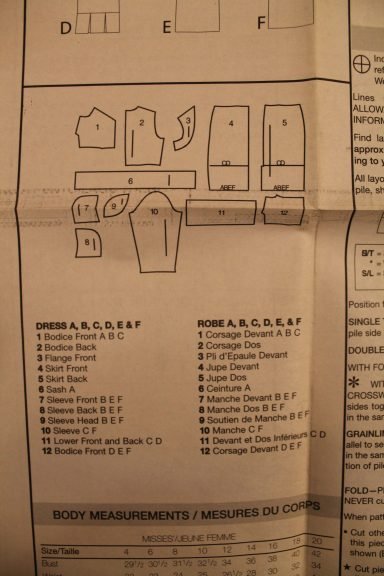
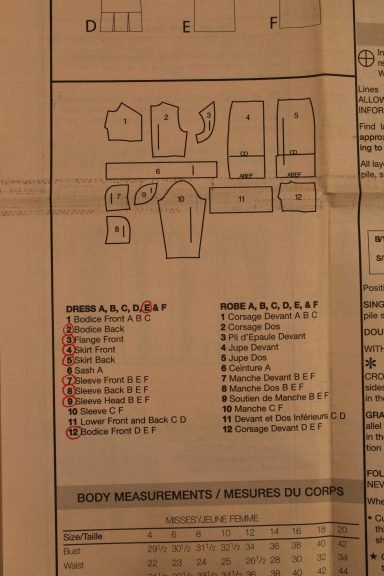
12. There is some additional fabric information on the instruction sheet so make sure you have made a note of these also. Using the same guidelines as before we can see exactly how much fusible interfacing and lining fabric we require for our size 14 dress E.

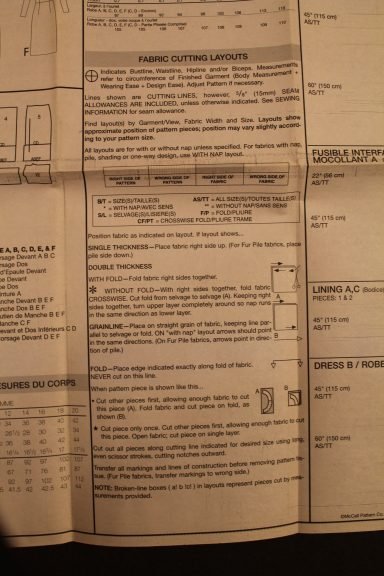
13. The next section of information is very important as it decodes the symbols and colours the pattern uses. It is important to read through this information and take some time to understand it as it will make the dressmaking process much easier. The instructions are usually pretty detailed but unfortunately can differ from pattern to pattern so taking your time to familiarise yourself with the specifics of your chosen pattern is important, even if you have used other patterns before. The symbols in this particular key are referring to the laying out of the pattern pieces onto fabric for cutting. I will talk through the symbols that feature on the actual pattern pieces later on. The instruction sheet will often state the seam allowance included in the pattern pieces here. Make a mental note of the allowance and bear in mind that there may be instances written on the paper pattern pieces (at the hemline for example) where an alternative seam allowance is given.
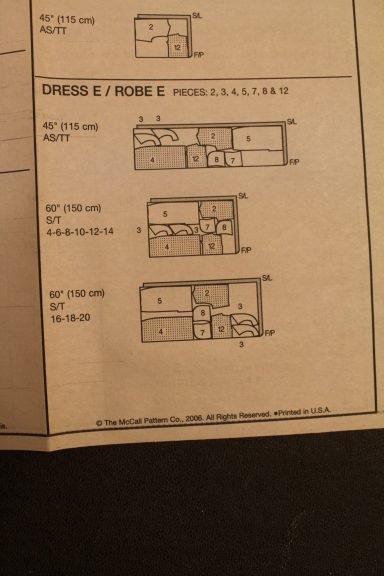
14. Lastly we have diagrams showing how to lay out our pattern pieces onto our fabric, depending on the style of dress chosen and width of fabric. Here we also have the pattern pieces we require listed for our reference. For our dress E, following the key as set out in the pattern instructions, we can see we have one layout for all dress sizes for a 45” width fabric, and two options, depending on chosen dress size, for a 60” width garment. Some of the pieces appear shaded and some plain. By referring back to the key again, we can see that the shaded pieces mean to place the pattern piece the right side down, while the plain are right side up. By following these guidelines we know that all of the pattern pieces will fit the fabric amounts we have.
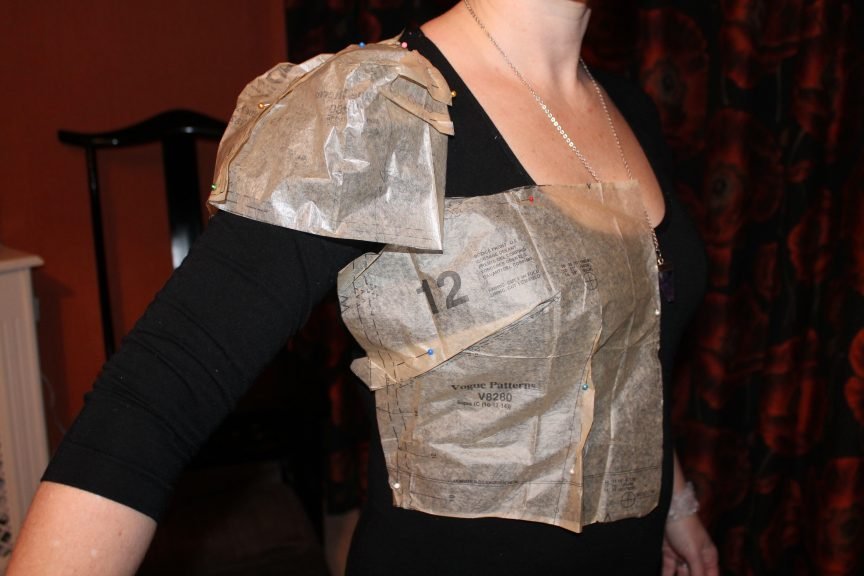
15. The next step is to adjust the pattern to fit our individual frame. This is where home dressmaking really comes into its own. We are all different body shapes and sizes, and very few of us conform to a standard dress size all over. As such we are able to manipulate the pattern to fit us exactly which in turn ensures a perfect fitting garment. Once you have cut out the pattern pieces along the lines that coordinate with your chosen dress size, press the pieces with a dry, cool iron and lay them out. Select your pattern piece and, using straight pins, pin any darts or pleats that feature on that part of the pattern. Place them over the body (if you are making for yourself you may wish to ask a friend for help for this part) and assess where the dart point are in line with the bust point, and if the darts are big enough or small enough to accommodate the body’s curves. Adjust accordingly to fit your shape. Pin the pattern pieces together to see how the finished garment will sit. You may wish to take it in at the waist, hips, or bust. This is where cutting the pattern to the biggest size measured comes in handy. It is much easier to make a pattern or garment smaller than it is to make it bigger!
16. Finally you will notice that the pattern shows two parallel lines that run across the pattern pieces. These are points at which we can lengthen or shorten the pattern pieces. These lines usually appear where a centre back (nape to waist) measurement or a hem length is required. We adjust these lines by folding the pattern up to make it smaller or, to make it bigger, cut along the line and fill in the gap created with a scrap piece of pattern paper and some light weight sticky tape.
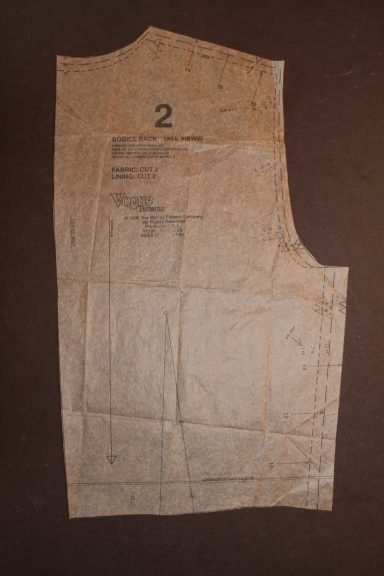

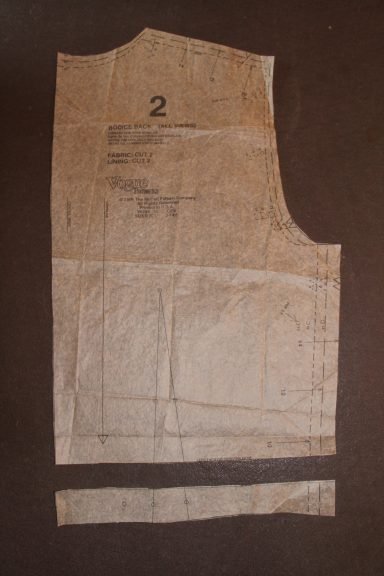
17. Once you have your finalised pattern pieces fitted, transfer any new stitching lines to the paper, remove the pins, and re-press. Now is the time to lay out our pattern pieces onto our fabric as demonstrated in the handy diagram. Two of the markings you will notice on the pattern pieces are the ‘straight grain’ arrow and the ‘cut on fold’ arrow. If a pattern piece doesn’t have a ‘straight grain’ arrow it will have a ‘cut on fold’ symbol instead. This simply means that the edge of the pattern piece needs to be laid along the folded edge of your fabric. When you cut out the pattern piece in this way, the fabric will open up as one symmetrical piece, much like how we used to make paper butterflies in school.

18. The straight grain arrow must lie along the straight grain of the fabric. The straight grain runs along the length of the fabric, parallel to the selvedge edge (the neat sides running down each side of the fabric). If the arrow does not line up with the straight grain it can affect how the garment hangs. If your chosen garment has a draped effect to it, quite often this means the pattern pieces are cut ‘on the bias’. The bias runs diagonally across the straight grain at 45 degrees. You will still notice that your pattern pieces have a ‘straight grain’ arrow but that these will run diagonally across the pattern pieces rather than from top to bottom as they do in our example. The practice is still exactly the same.
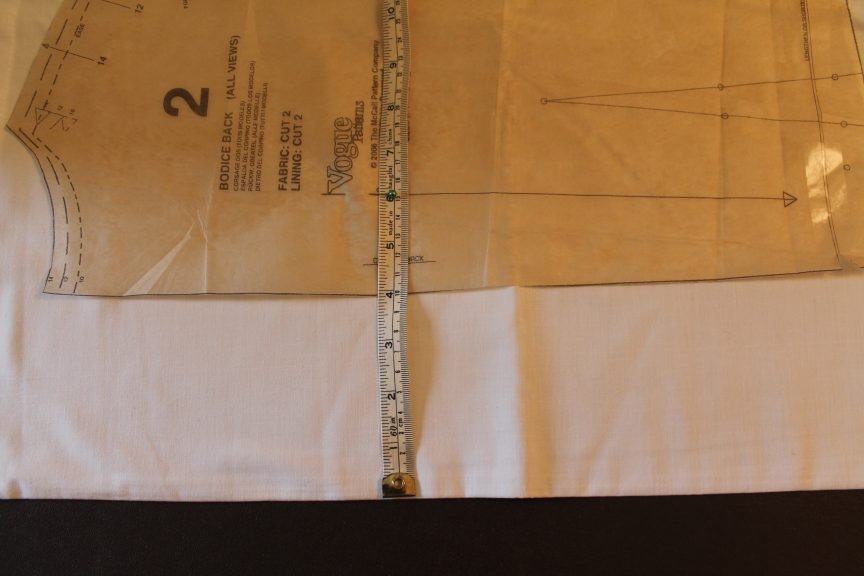
19. To make sure your pattern piece is sitting exactly along the straight grain, lay your pattern piece onto the fabric. Using a tape measure, measure the distance between the selvedge edge and one end of the straight grain arrow. Make a note of the number and pin the pattern piece to the fabric at this point. Then take your tape measure to the other end of the arrow and measure the distance between the selvedge edge and this point. Pivot the pattern piece until the numbers are the same and pin this end of the arrow. You now know that your pattern piece is in the right position on the grain. Continue to pin the rest of your pattern piece to the fabric and repeat this process with the rest of the pieces.


20. You will notice a number of different symbols across the pattern pieces. Generally speaking most pattern making companies will use the same or very similar symbols so the key in the following image is fairly uniform across all patterns.
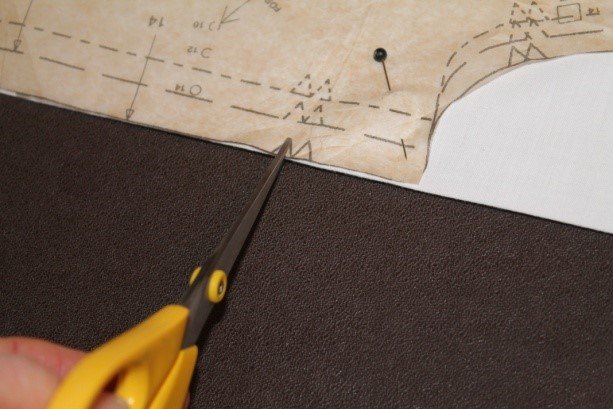
21. Once you have cut out your fabric pieces, the next thing to do is to transfer all markings from the paper pattern pieces to your fabric pieces. Two of the main ones to know are ‘notches’ and ‘dots’.
a. NOTCHES: These are shown as triangles that sit along the cutting lines of the pattern. To transfer these markings, simply snip a straight cut up to the point of the triangle using sharp embroidery or dressmaking scissors. Make sure to only snip the triangles relevant to your chosen dress size.
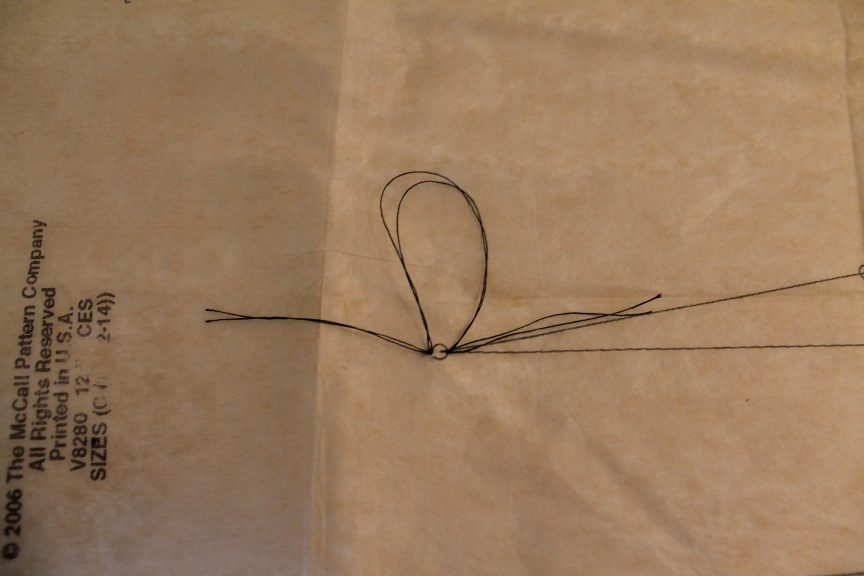
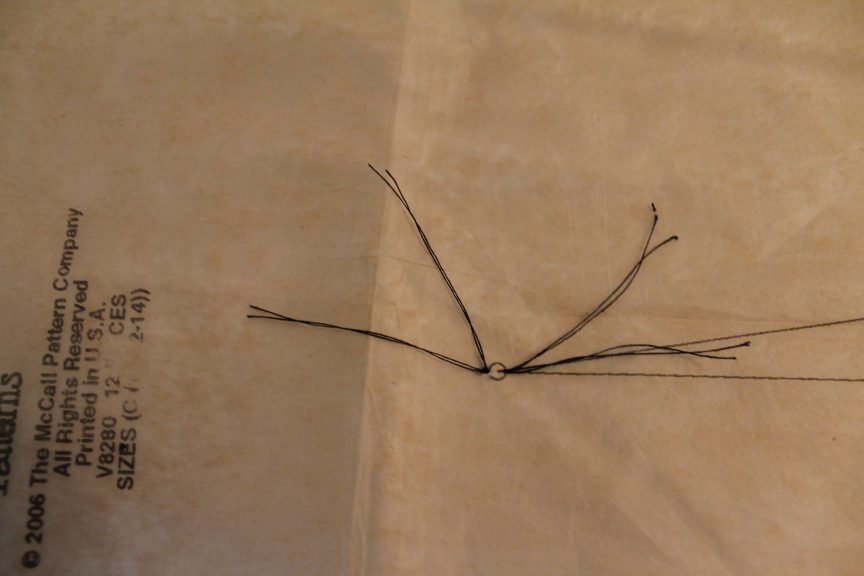
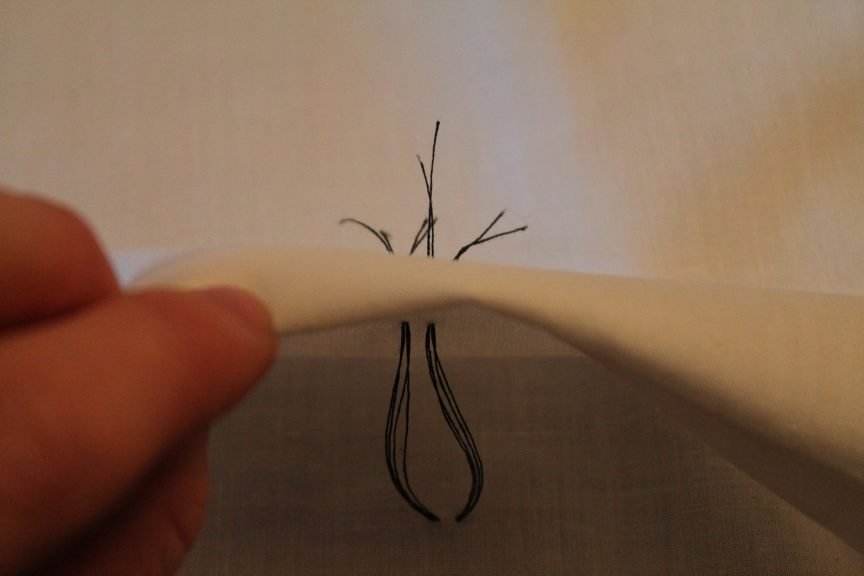
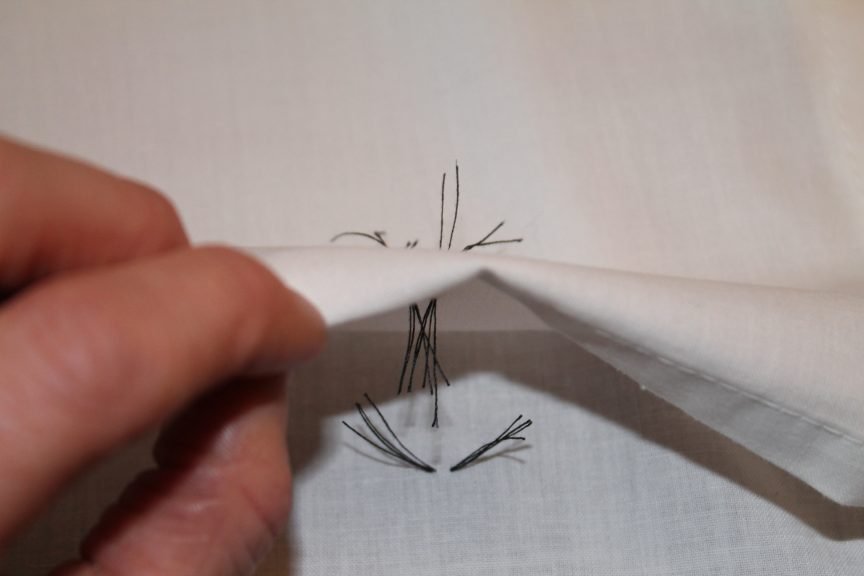
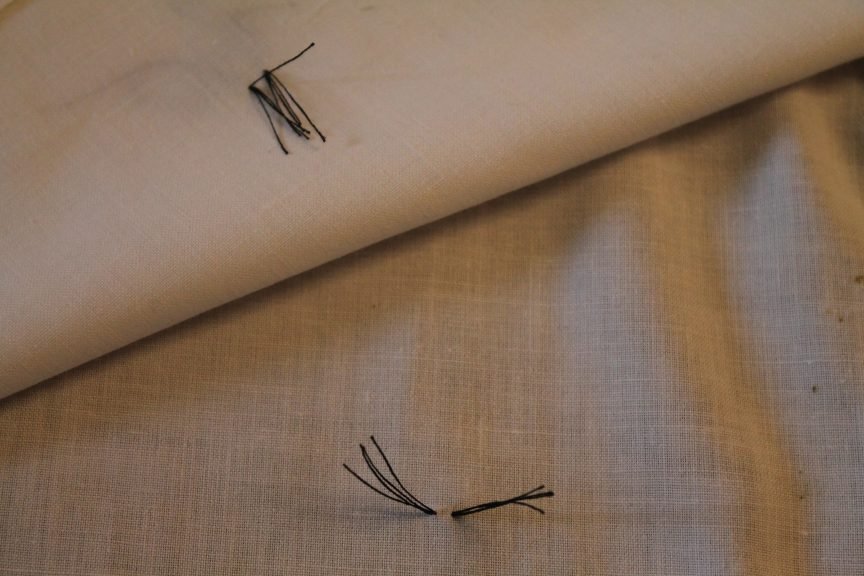
b. DOTS: these are small or medium sized circles placed strategically across the pattern, usually to mark the positions of darts or pleats etc. I can recommend using ‘tailor’s tacks’ to transfer these dots. To create a tailor’s tack, thread a sewing needle with double stitching thread. (Tip – if you are using very pale fabrics, choose a thread that is only slightly darker, and the same if using dark fabrics use a contrast thread only slightly lighter. When you come to remove the tacks at the end, some fibres from the threads may be left behind and will show up if a high contrast thread has been used. In the images I have used a black thread on a white fabric purely to make it easier to see for teaching purposes. In a real life example I would choose a much paler thread colour for this.)
Once you have threaded your needle up, push the needle in through one side of the dot, through all the layers of fabric and come back up at the opposite side of the dot. Pull the thread through leaving a 2” tail. Repeat this process again leaving a 4” loop, and cut away the thread leaving a 2” tail on the opposite side of the dot. Snip the loop in the middle. This should leave four 2” thread tails on each side of the dot. When it comes to the point of removing the pattern piece, carefully pull the paper off of the thread tails. Carefully pull the top layer of fabric up the thread tails until only approx 3/4” of the tails is showing on the top of the fabric and approx 1 ¼” in between the layers. Snip the threads in half between the layers. This should leave thread tails in both layers of fabric.

22. The final step now is to remove your paper pattern pieces and start sewing, following the instructions and diagrams on the instruction sheets. I recommend folding the pattern pieces away neatly back in the envelope, ready to be used again. If you plan to remake the pattern more than two or three times, I recommend transferring the pattern pieces to stronger pattern paper, or plain lining paper from any good DIY store can be used also. This will give your pattern much greater longevity! Happy making!


